DIN Rail Mounting Plate for Raspberry Pi


- Mount your Raspberry Pi device on a DIN rail
- Mount Pi 1, 2, 3, 4, & 5 Models A/A+, B/B+ and Model Zero/Zero W
- Sturdy construction
- Right-angle design saves valuable space on DIN rail
- Plate size: approx 2.75" x 3.4"
- Screws and nylon standoffs included

General Description

Use these sturdy DIN rail mounting plates to mount your device to a standard 35mm DIN rail. This product features a flat plate mounting surface to which you can mount your device, and a metal DIN rail bracket secures the plate to the DIN rail. The pre-drilled holes in the plate make it simple and easy to attach your device to the plate using the included screws and nylon standoffs.
Pre-drilled holes are located to accommodate Model A/A+, Model B/B+, and Zero/Zero W varieties of Raspberry Pi devices (includes Pi 1, 2, 3, 4, & 5). Simply attach the included nylon standoffs to the plate, and screw the Arduino device to the standoffs (screws included).
The 'right angle' design of this product allows you to mount devices perpedicular to the DIN rail, increasing device density. You can mount Raspbery Pi devices at a fraction of the horizontal space they would normally consume.
The mounting plate is made of sturdy 0.125" thick FR4 material (glass-reinforced epoxy laminate material). It comes with a sturdy steel DIN rail bracket (part# DINM31) installed on the plate. The steel brackets may be purchased alone if you desire the bracket without the adapter plate.
These adapter plates are alternately known as DIN rail mounting plates, DIN adapter plates, DIN rail brackets, etc. We sell many varieties of universal DIN rail mounting plates and DIN clips for numerous applications.
Application Examples
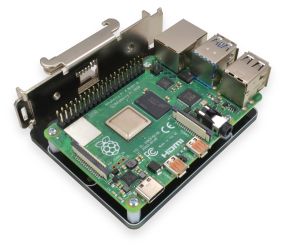
The photo below shows a Raspberry Pi 4 Model B mounted to this product, which is mounted on a DIN rail.
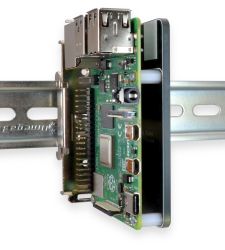
 Click image to enlarge.
Mounting your Raspberry Pi Device to the Plate
To mount your Raspberry Pi device, first attach the nylon standoffs to the plate in the appropriate locations using the included flat-head screws. Then, attach your device to the nylon standoffs using the included pan-head screws.
Metric Hardware Vs Imperial Hardware
The DINP07-PI01 and DINP07-PI01M are two versions of the same Raspberry Pi mounting product, differing only in the type of hardware included. The DINP07-PI01 comes with imperial (#2-56) hardware, while the DINP07-PI01M includes metric (M2.5) hardware. M2.5 hardware are more commonly used in Raspberry Pi accessories, although both options can be used.
Stacking a Hat on the Raspberry Pi
With the nylon standoffs already installed in the plate (with the four flat-head screws), attach the Raspberry Pi to the standoffs. Instead of using the pan-head screws, use your own Male-Female standoffs. The height of the header on the hat will vary somewhat based on the particular hat being used, so be sure to check what standoff length is appropriate for your particular application. Once the Pi has been secured using your Male-Female standoffs, the hat can be installed onto the Pi's header, and can be secured using the 4 pan-head screws. Some example part numbers for Male-Female standoffs are listed below, and are sold by Digikey and other sources:
- #2-56 with 0.5" between-board distance: RAF Electronic Hardware 4505-256-N
- M2.5 with 12.0mm between-board distance: RAF Electronic Hardware M2107-2545-N
Installing and Removing the Plate Assembly on DIN Rail
These DIN rail plate assemblies are easily attached and detached from the DIN rail. When on the rail, the bracket latches to the rail on both the top and bottom lips of the rail. The bracket should be oriented such that the "fixed" (non spring-loaded) end of the bracket mounts to the top of the DIN rail, thus allowing the fixed end to bear the load. The spring-loaded sliding hooks will then grip the bottom of the DIN rail. This arrangement provides the greatest rigidity and load capacity.
There are methods for removing the plate from the DIN rail:
Product Documents
| Part # | Description | PDF Drawing | DWG Drawing | IGES Model | STEP Model |
|---|---|---|---|---|---|
| DINP07-PI01 | DIN Plate, for Raspberry Pi, #2-56 Hardware | ||||
| DINP07-PI01M | DIN Plate, for Raspberry Pi, M2.5 Hardware |
DIN Plate, for Raspberry Pi, #2-56 Hardware
DIN Plate, for Raspberry Pi, M2.5 Hardware
Product Details
- Mount Pi 1, 2, 3, 4, & 5 Models A/A+, B/B+ and Model Zero/Zero W
- Plate size: approx 2.75" x 3.4"
- Screws and nylon standoffs included
- Constructed of 0.125" thick FR4 material
- 25mm wide right angle steel DIN bracket
- Clips onto 35mm DIN rail
- Color: Black
- DIN Rail and Raspberry Pi not included
Pricing and Ordering
| Product # | Description | 1+ | 10+ | 25+ | 50+ | RoHS | Buy Now |
|---|---|---|---|---|---|---|---|
| DINP07-PI01 | DIN Rail Mounting Plate, Right Angle, for Raspberry Pi Modules; with Steel Bracket; for 35mm DIN Rail; with #2-56 screws / standoffs. | $13.88 | $12.69 | $12.48 | $11.60 | Yes | |
| DINP07-PI01M | DIN Rail Mounting Plate, Right Angle, for Raspberry Pi Modules; with Steel Bracket; for 35mm DIN Rail; with M2.5 screws / standoffs. | $13.88 | $12.69 | $12.48 | $11.60 | Yes |
| Quantity | Price |
|---|---|
| 1+ | $13.88 |
| 10+ | $12.69 |
| 25+ | $12.48 |
| 50+ | $11.60 |
| Quantity | Price |
|---|---|
| 1+ | $13.88 |
| 10+ | $12.69 |
| 25+ | $12.48 |
| 50+ | $11.60 |
All of the above items are normally stocked. Please call us if you need to verify availability for a specific quantity, or for pricing at higher quantities. Please visit our ordering page for our ordering policies and a list of ordering methods.